React Self Study
Book Pro React 16
- ISBN: 978-1-4842-4450-0
- homepage
TODO LIST
- TODO: Chapter 13. Know more about componentWillUnmount. How to close network connections, how to stop any asynchronous tasks.
Chapter 09
- to be updated
Chapter 10
- to be updated
Chapter 11 Stateful Component
- Stateful Component Definition
import React, { Component } from 'react'

export default class statefulComponent extends Component {
  constructor(props) {
    super(props)

    this.state = {
      myState: 0
    };
  }

  handleClick = () => {
    this.setState({ myState: 1 });
  }

  render() {
    return (
      <div>
        <button onClick={this.handleClick}>Click Me!</button>
      </div>
    )
  }
}
- ⚠️Avoiding the Dependent Value Pitfall
How to avoid: When you have a series of dependent changes to make, you can pass a function to the setState method that will be invoked when the state data has been updated and that can be used to perform tasks that rely on the changed state values(Page. 299)
- ⚠️Avoiding the Missing Updates Pitfall
If you need to perform multiple updates and have each take effect in sequence, then you can use the version of the setState method that accepts a function as its first argument.(Page. 302)
- Defining Prop Types and Default Values
- componentName.propTypes & componentName.defaultProps
- static propTypes & static defaultProps
Chapter 12 Working With Events
- Events
Events are handled using properties that share the name of the corresponding DOM API property, expressed in camel case. The DOM API onclick property is expressed as onClick in React applications and specifies how to handle the click event, which is triggered when the user clicks an element.
-
AVOIDING THE EVENT FUNCTION INVOCATION PITFALLS
-
⚠️ The first mistake is to enclose the function you require in quotes rather than braces. This provides react with a string value instead of a function and produces an error in the browser’s Javascript console.
<button className="btn btn-primary" onClick="this.handleEvent" >
- ⚠️ The other common mistake is to use an expression that invokes the function you require. This expression results in react invoking the handleEvent method when the component object is created and not when an event is triggered. You won’t receive an error or warning for this mistake, which makes the problem harder to spot.
<button className="btn btn-primary" onClick={ this.handleEvent() } >
- Access Component Features
/*******************
    1st Methord
********************/
handleEvent = () => {
  //do something
}
...
onClick = {this.handleEvent}

/*******************
    2nd Methord
********************/
handleEvent  ()  {
  //do something
}
...
onClick = {() => this.handleEvent()}

/*******************
    3rd Methord
********************/
constructor(props){
  this.handleEvent = this.handleEvent.bind(this)
}
...
onClick = {this.handleEvent}
- Avoiding the Event Reuse Pitfall
React reuses SyntheticEvent objects and resets all the properties to null once an event has been handled. The persist method is used to prevent React from resetting the event object,
foo = () => {
  event.persist()
  // do something
}
- Invoking Event Handlers with a Custom Argument
  handleEvent = (event, newTheme) => {
    this.setState({ theme: newTheme });
  }

  <button
    className={`btn btn-${this.state.theme} m-2`}
    {/* Custom parameter*/}
    onClick={(e) => this.handleClick(e, "danger")}>
    Danger
  </button>
- Preventing Default Behavior
Some events have behavior that the browser performs by default. The preventDefault method can be called on event objects to prevent the default behavior.
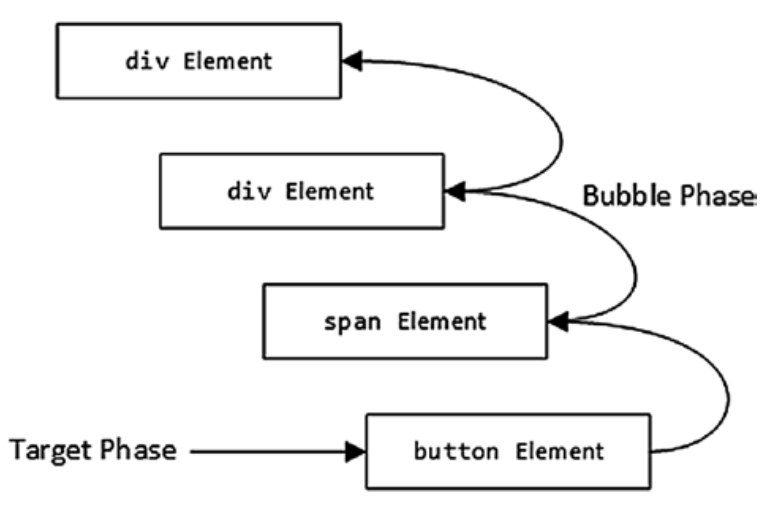
- Target Phase and Bubble Phase
When an event is first triggered, it enters the target phase, where event handlers applied to the element that is the source of the event are invoked. Once those event handlers are complete, the event enters the bubble phase, where the event works its way up the chain of ancestor elements and is used to invoke any handlers that have been applied for that type of event.
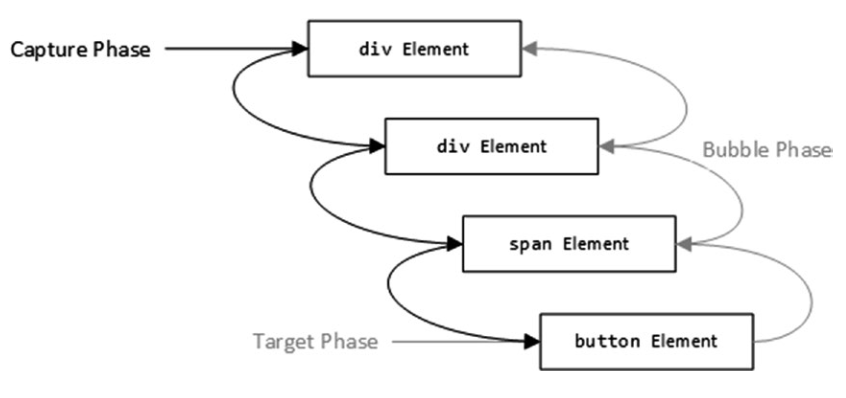
- Capture Phase
The capture phase provides an opportunity for elements to process events before the target phase. During the capture phase, the browser starts with the body element and works its way down the hierarchy of elements toward the target, following the opposite path to the bubble phase, and gives each element the chance to process the event.
- Stopping Event Propagation
Understanding event phases can also be important if you want to disrupt the normal propagation sequence and prevent elements from receiving events.
event.stopPropagation();
Chapter 13 Reconciliation and Lifecycles
- Understanding the Update Process
When the application first starts, React asks all the components to render their content so that it can be displayed to the user. Once the content is displayed, the application is in the reconciled state, where the content displayed to the user is consistent with the state of the components. The setState method updates a component’s state data, but it also marks the component as stale, meaning that the HTML content displayed to the user may be out-of-date.
- Understanding the Update Processing
Making changes to the HTML elements in the Domain Object Model is an expensive operation and so React compares the content returned by the components with the previous results so that it can ask the browser to perform the smallest number of operations, a process known as reconciliation.
- How to manipulate an HTML Element in Chrome Console
// IN COMPONENT definition, ADD ID PROPERTY
<div id="messageDiv" className="h5 text-center p-2">

//In the chrome console run the command below.
//Change the background color of the div element.
document.getElementById("messageDiv").classList.add("bg-info")
-
To ensure that React is able to minimize the number of changes it has to make to display a change, elements generated from arrays are required to have a key prop, such as the one defined by the List component.
-
React provides the forceUpdate method, which can be used to explicitly trigger an update and ensures that any changes are reflected in the content presented to the user.
-
The process by which React creates a component and renders its content for the first time is called mounting
-
React creates a new component object and goes through the mounting process, calling each of the methods in turn: constructor, render, and componentDidMount.
-
Update Phase: Render() -> componentDidUpdate(). After the component is mounted, the componentDidUpdate method will be called each time the component is updated.
-
When a component is about to be destroyed, React will call the componentWillUnmount method, which provides components with the opportunity to release resources, close network connections, and stop any asynchronous tasks.
-
shouldComponentUpdate: This method allows a component to indicate that it does not need to be updated.
-
The arguments to the shouldComponentUpdate method are new props and state objects that can be inspected and compared to the existing values.
shouldComponentUpdate(newProps, newState) {
  ...
  return boolean result;
}
- getDerivedStateFromProps: This method allows a component to set its state data values based on the props it receives.
The getDerivedStateFromProps method is static, which means that it is unable to access any of the instance methods or properties via the this keyword. Instead, the method receives a props object, which contains the props values provided by the parent component, and a state object, which represents the current state data. The getDerivedStateFromProps method returns a new state data object that is derived from the prop data.
static shouldComponentUpdate(newProps, newState) {
  return new state
}
Chapter 14 COMPOSING APPLICATIONS
- Using the Children Prop
React provides a special children prop that is used when a component needs to display content provided by its parent but doesn’t know what that content will be in advance. This is a useful way of reducing duplication by standardizing features in a container that can be reused across an application.
render(){
  return
  <div>
  // Container elements
  {this.props.children}// Used to show children components
  </div>
}
| Function | Comment |
|---|---|
| React.Children.map | This method invokes a function for each child and returns an array of the function results. |
| React.Children.forEach | This method invokes a function for each child without returning an array. |
| React.Children.count | This method returns the number of children. |
| React.Children.only | This method throws an array if the collection of children it receives contains more than one child. |
| React.Children.toArray | This method returns an array of children, which can be used to reorder or remove elements. |
| React.cloneElement | This method is used to duplicate a child element and allows new props to be added by the container. |
- Adding Props to Container Children
Use React.Children.map and React.cloneElement
let modChildren = React.Children.map(
                    this.props.children,
                    (child => React.cloneElement(child,
                      {newProp: val})));
- Createting a Specialized Component
Some components provide specialized versions of the features provided by another, more general, component. React relies on the specialized component rendering the more general component and managing its behavior with props.
export class GeneralList extends Component{
  //Show item of an array
}


export class SortedList extends Component{
  handleSorted = () => {
    this.state.dataList.sorted();
    ...
  }
  render(){
    <div>
      <GeneralList list={this.state.dataList}>
      <button onClick={this.handleSorted}>Sort List </button>
    </div>
  }
}
- Creating Higher-Order Components
Higher-order components (HOCs) provide an alternative to specialized components and are useful when components require common code but may not render related content. HOCs are often used for cross-cutting concerns, a term that refers to tasks that span the entire application and would otherwise lead to the same features being implemented in several places. Because HOCs are functions, you can define additional arguments to configure behavior.
export default function Foo(wrappedComponent){
  return(
    <NewComponent />
  )
}
- Using Render props
A render prop is a function prop that provides a component with the content it should render, providing an alternative model of wrapping one component in another.
export default class RenderProps extends Component {
  render(){
    ...
    this.props.render()
    ...
  }

class APP extends Component {

  render(){
    ...
    <div>
      <RenderProps render={() => <SortedList data={this.Names} />} />
    </div>
    ...
  }

}
-
prop drilling or prop threading, where data values are passed through the component hierarchy to reach the point where they can be used.
-
Using Context For Global Data
-
Step 1: Define the Context
export const SomeContext = React.createContext({
  prop1: prop2Value,
  prop2: prop2Value,
  func: () => {}
});
- Step 2: Context Consumer
...
  return <SomeContext.Consumer>
  {contextData =>
    //...context can be consumed here...
  }
  <SomeContext.Consumer>
...
- Step 3: Context Provider
<SomeContext.Provider value ={this.state.SomeContextData}>
  //Component that use the context
</SomeContext.Provider>
- Error Boundaries
The componentDidCatch method receives the error object thrown by the problem component and an additional information object that provides the component’s stack trace, which can be useful for logging.
Chapter 15 Forms and Validation
- The Object.keys() method returns an array of a given object’s own enumerable property names, iterated in the same order that a normal loop would.
- The contents of the square brackets (the [ and ] characters) are evaluated to get the property name for the state update, which allows me to use the name property from the event.
...
updateFormValue = (event) => {
this.setState({ [event.target.name]: event.target.value },
() => this.props.submit(this.state));
}
...
-
Using select elements that present multiple items
- Element defination:
<select className="form-control" multiple={true} name="toppings" value={ this.state.toppings } onChange={ this.updateFormValueOptions }>- Event Handler:
... updateFormValueOptions = (event) => { <!-- Generate value list in array format --> let options = [...event.target.options] .filter(o => o.selected).map(o => o.value); this.setState({ [event.target.name]: options }, () => this.props.submit(this.state));} ... -
Using Radio Buttons. Radio buttons allow the user to select a single value from a list of options.
  <div className="form-group">
    <label>Ice Cream Flavors</label>
    { this.flavors.map(flavor =>
    <div className="form-check" key={ flavor }>
      <input className="form-check-input"
        type="radio" name="flavor"
        value={ flavor }
        checked={ this.state.flavor === flavor }
        onChange={ this.updateFormValue } />
      <label className="form-check-label">
        { flavor }
      </label>
    </div>
  )}
  </div>
- Using Checkbox. The checked property has been used to determine whether the user has checked or unchecked the element.
- Using Checkboxes to Populate an Array:
Array.prototype.splice(): The splice() method changes the contents of an array by removing or replacing existing elements and/or adding new elements in place.
// Syntax
splice(start)
splice(start, deleteCount)
splice(start, deleteCount, item1)
splice(start, deleteCount, item1, item2, itemN)
...
handleCheckboxChange = (event) => {
    if (event.target.checked) {
      this.state.toppingC.push(event.target.value)
      this.setState({ "toppingC": this.state.toppingC },
        () => { this.props.submit(this.state) });
    }
    else {
      let index = this.state.toppingC.indexOf(event.target.value)
      this.state.toppingC.splice(index, 1);
      this.setState({ "toppingC": this.state.toppingC },
        () => { this.props.submit(this.state) });
    }
  }
...
<div className="form-group">
  <label>Ice Cream Toppings</label>
  {this.toppings.map(t =>
    <div className="form-check text-left" key={t}>
      <input className="form-check-input" type='checkbox' value={t} name="toppingC" id={t} onChange={this.handleCheckboxChange} />
      <label className="form-check-label" htmlFor={t}>{t}</label>
    </div>
  )}
</div>
...